Blog
In a field that evolves daily, staying ahead means staying informed.
Explore in-depth articles designed to help you solve complex challenges,
maximize your machine’s ROI.
Stay ahead in a competitive market.


In a field that evolves daily, staying ahead means staying informed.
Explore in-depth articles designed to help you solve complex challenges,
maximize your machine’s ROI.
Stay ahead in a competitive market.
News | Oct-26-2026 | Mimowork
Laser marking brass creates permanent identification codes, logos, text and decorative designs on brass parts. Because bare brass is highly reflective, a standard CO2 laser struggles to mark it directly. Fiber lasers, especially MOPA fiber lasers, are the preferred option. Results vary dramatically based on brass alloy (H62, H65 etc.), surface finish (polished, brushed, lacquered), laser pulse settings and whether you only need surface colour change (marking) or physical material removal (deep engraving).
Yes. Brass can be laser marked successfully, but its high reflectivity and copper-zinc alloy thermal behaviour make it less forgiving than aluminium or stainless steel. Brass is an alloy of copper and zinc. Minor shifts in alloy ratio, plus polishing, brushing, clear lacquer or gold plating, will completely change how it reacts under the laser beam. Polished brass reflects far more laser energy than brushed brass and is much harder to get high-contrast marks on.
Common applications include:
• Serial numbers and traceability codes for industrial components
• Brand logos on brass hardware, fittings and accessories
• Decorative patterns on brass plaques, nameplates and gift tags
• QR codes and data matrix codes for part tracking
• Custom personalised markings on brass jewellery and decorative blanks
Before choosing a laser, clarify your goal: a subtle dark oxidation mark, a high-contrast black mark, or a recessed engraved groove. These three outcomes require different laser setups and parameters.
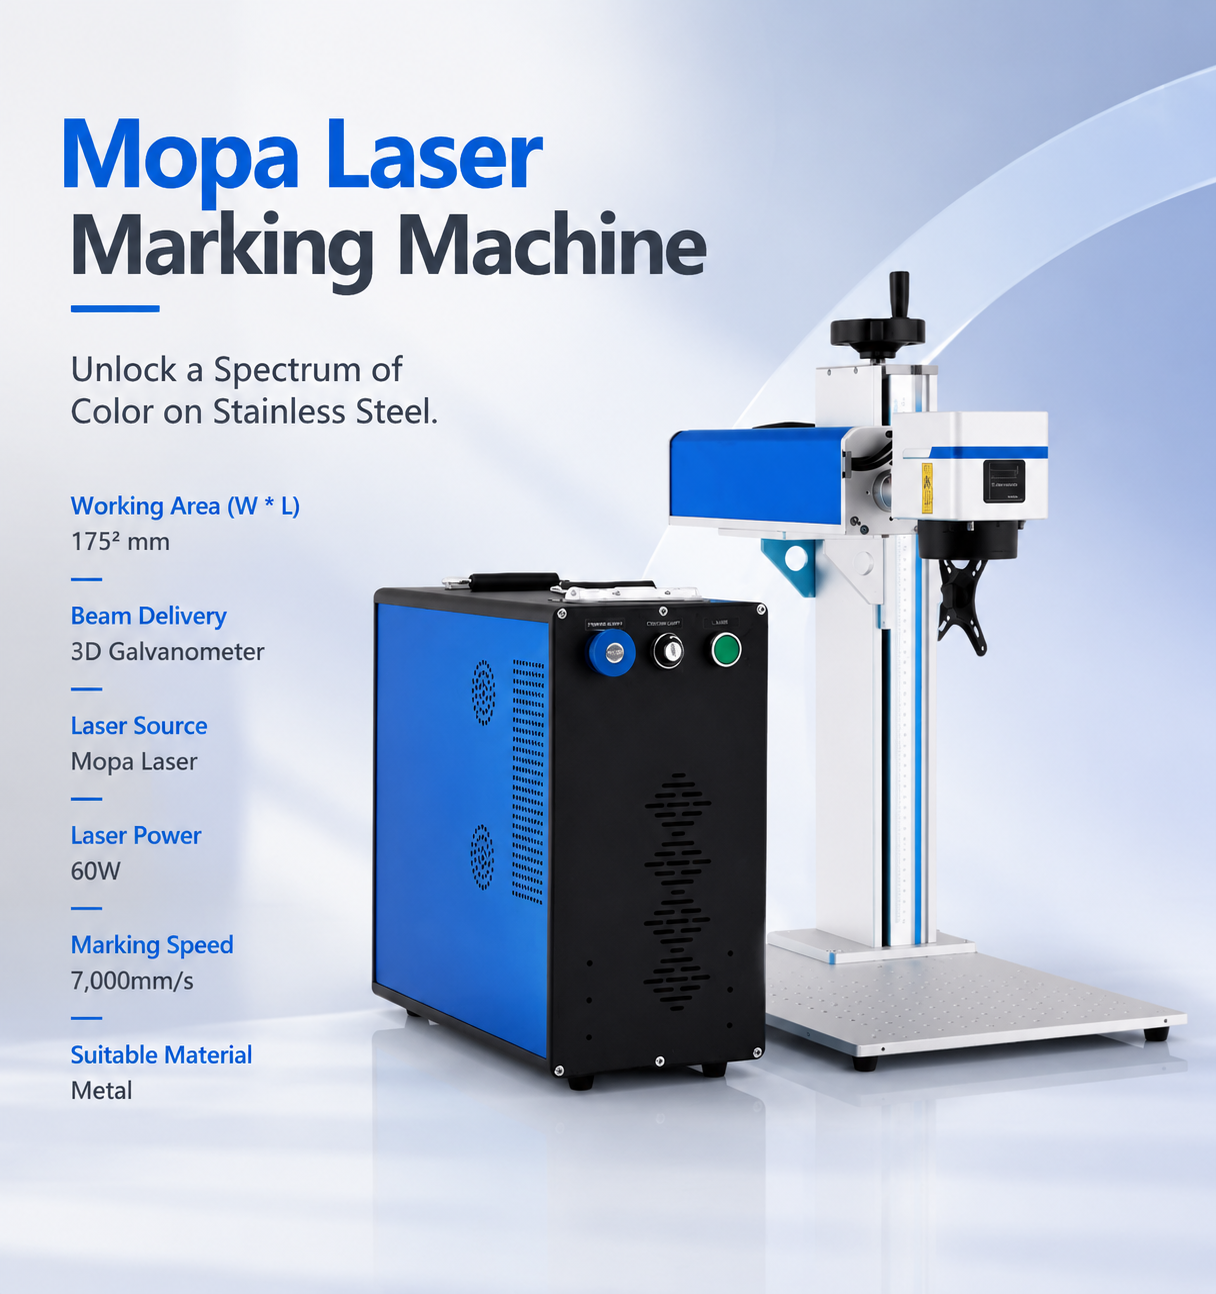
For direct marking on bare brass, a fiber laser is the mainstream choice. However, standard fiber and MOPA fiber lasers are not interchangeable when selecting a Laser Marking Machine for brass applications. MOPA technology offers adjustable pulse width, providing greater control over oxidation and helping prevent unwanted rainbow discoloration.
| Laser Type | Suitability for Brass | Important Considerations |
| Fiber laser | Generally suitable for direct marking on bare brass | Reflectivity, alloy grade, and surface finish affect marking contrast. Brown or gray marks are generally easier to achieve than solid black marks. |
| MOPA fiber laser | Preferred for applications requiring consistent dark marks | Adjustable pulse duration helps control heat input and reduce unwanted rainbow oxidation, supporting more uniform dark marking. |
| CO2 laser | Generally unsuitable for direct marking on bare brass | Typically requires a pre-applied paint or lacquer coating to create a mark; it cannot directly mark bare brass effectively. |
When choosing a Laser Marking Machine for brass, consider the brass alloy, workpiece dimensions, required marking area, desired contrast, and production volume. Matching the laser technology to these requirements helps achieve more consistent marking results and improves overall production efficiency.
This is the most skipped step for beginners. Solid brass, brass-plated steel, lacquer-coated brass and cast brass all react differently. A shiny gold surface is not guaranteed to be solid brass. If the alloy grade is unknown, ask your supplier and always test on an offcut from the exact same batch. H62, H65 and H70 brass deliver noticeably different marking contrasts.
Grease, hand fingerprints, polishing paste and residual lacquer ruin mark consistency on brass. Degrease the surface with a suitable cleaner and let it fully dry before marking.
For polished brass, two common tricks can help. First, leave a thin protective laser film on top during marking to reduce reflection and prevent wide heat-affected zones. Second, light micro-abrasion can lower reflectivity if higher contrast is required.
Keep surface preparation identical across a production run, or your marks will vary from part to part.
Set up logos, text, serial numbers or 2D code in your laser marking software. For brass, fine features are unforgiving. Tiny text and dense Data Matrix or QR codes need thicker stroke widths than they would on stainless steel. A design that looks crisp on screen can blur or break apart after laser interaction with reflective brass.
Focus precisely to the top surface of the brass blank. Always test on scrap from the same material batch. Tweak parameters one at a time. For brass, pulse duration and frequency often matter more than raw power.
| Parameter | Effect on the Mark | What to Check on Brass |
| Laser power | Energy delivered to the surface | Contrast level, overheating and rainbow oxidation |
| Marking speed | Dwell time of each pulse | Legibility and risk of melting the surface |
| Pulse frequency | Pulse overlap | Uniformity and grainy texture |
| Pulse duration | Heat control, MOPA only | Critical for avoiding multi-coloured oxide layers |
| Line spacing | Overlap between marking lines | Striping or patchy fill |
| Focus position | Beam spot size | Sharpness of edges and broken lines caused by reflection |
There is no universal parameter set for brass. Polished brass, brushed brass and cast brass will produce completely different results even with identical laser settings.
Check under consistent, neutral lighting. Judge contrast, edge sharpness and unwanted heat discoloration.
If the mark is faint, incrementally adjust energy and prioritise pulse settings before increasing power. If you see iridescent rainbow rings around the mark, the brass has overheated. You may need shorter pulses or faster marking speed.
For traceability codes, test scanner readability under your real working environment, not just under bright desk light.
These terms are often mixed up, but they describe different physical results on brass.
Laser marking involves controlled surface oxidation or colour change, with no meaningful material removal. It is fast and widely used for logos, serial numbers and QR codes.
Laser engraving or deep engraving removes brass material to create a recessed groove. Deep engraving on brass generates substantial heat and can deform thin workpieces. It usually requires multiple passes and lower energy per pass.
| Requirement | Process to Evaluate | Main Priority |
| Logos and product branding | Laser marking | Stable, even contrast |
| Serial numbers and traceability codes | Laser marking | Scanner readability and repeatability |
| Decorative surface patterns | Laser marking or shallow engraving | Clean visual finish without rainbow tarnish |
| Recessed, tactile text or deep features | Multi-pass laser engraving | Depth control and minimal deformation |
Suppliers may use inconsistent terminology, so describe the final visual and tactile result you need instead of relying only on the terms engraving or marking.
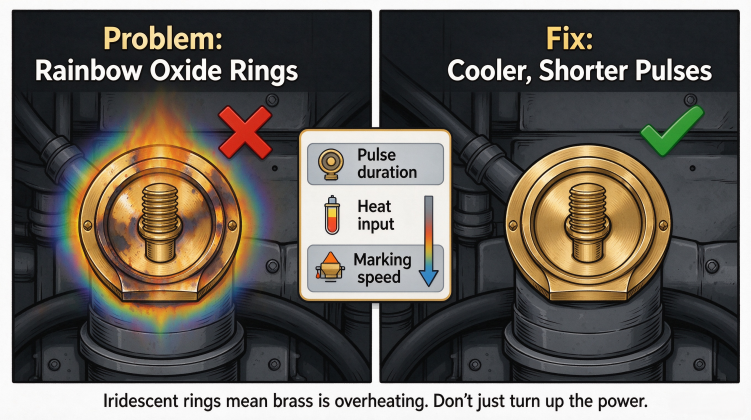
Root cause: High surface reflectivity, especially on polished brass, or incorrect pulse settings.
Fix: Try protective film, mild surface micro-abrasion or a MOPA laser for better oxidation control.
Root cause: Overheating creates mixed copper-zinc oxide layers. This is a characteristic problem when laser marking brass.
Fix: Reduce heat input. Shorter pulse width is often the most effective adjustment with a MOPA laser.
Root cause: Uneven polishing, surface contamination or beam reflection bouncing back into the marking zone.
Fix: Standardise cleaning, use protective film where appropriate and double-check focus.
Root cause: Heat bleed blurs thin strokes on reflective brass.
Fix: Widen line weight in your artwork and reduce excess laser energy.
Root cause: Too much cumulative heat.
Fix: Lower single-pass energy and use multiple lighter passes where appropriate.
Root cause: Alloy, finish, required mark type and cycle time have not been clearly defined.
Fix: Share material samples and marking requirements with the equipment supplier for testing before selecting a machine.
Related Guide: The Ultimate Guide to MOPA Fiber Laser: High Contrast & Color Marking on Metal
Yes. Fiber lasers are the standard choice for direct brass marking. The final look depends heavily on alloy grade, surface finish and pulse parameters.
A conventional CO2 laser cannot mark bare brass directly. It can ablate paint or lacquer coatings on top of brass, but it will not produce a stable mark on raw metal.
Oxidation marks and engraved recesses are durable, but brass is prone to tarnishing over time. Wear resistance depends on the oxide layer and whether you add a protective clear coat after marking. Validate abrasion and corrosion resistance in your end-use environment.
Deep black marks are achievable, most reliably with a MOPA fiber laser. Standard fiber lasers often produce brown or grey marks instead. Results are not guaranteed for every brass alloy and surface finish, so sample testing is essential.
Prepare the brass alloy grade, part size, marking area, target contrast or depth, minimum feature size for text or QR codes, and daily production volume. These details help determine the required laser power, whether MOPA technology is necessary and which machine format is suitable.
Laser marking brass is an efficient solution for branding, traceability and decorative work on brass components. The biggest beginner trap is treating brass like stainless steel. Its high reflectivity and sensitive oxidation behaviour demand careful heat control.
Start by confirming your brass alloy and surface finish, run systematic parameter tests, and watch for the characteristic rainbow effect caused by overheating. For most commercial brass marking jobs, a properly tuned MOPA fiber laser can deliver more consistent results.
If you need reliable marking performance for brass and other metal parts, explore MimoWork’s laser marking solutions to compare suitable equipment for your materials, marking requirements and production needs.
News | Sep-14-2026